Important remarks
You should use code in repository as source of truth. Code in article don't describes all steps, don't contains all used code but it's shows you most important points and aproaches that was used.
If you don't understand Z80 mnemonics you can use this page. But it's describes only vanilla Z80 behavior. We have eZ80 CPU that have some unimplemented undocumented Z80 commands and have some extensions. But basicly code will work all the same way.
About basic difference between Z80 and eZ80 you can read here.
Also, I always used prefixed RST.LIL command(I'm talking about .LIL prefix) - it's important in ADL mode. .LIS prefix valid ONLY for legacy mode and not valid for ADL(according eZ80 documentation). I know that you seen ADL code with .LIS prefix but it works only by miracle(it's undefinded behavior). I strongly don't recommend use LIS prefix in ADL code for MOS calls.
If you making ADL applications - it is important use .LIL prefix for every system call.
Part that should be made on bigger computer(just cause we have no enough tools on Agon yet)
We have couple preparation steps that should be made on PC or Mac - drawing graphics for game and preparing levels.
This task CAN be solven on Agon Light but currently we have no enougth tools for it.
They should be written but game was made earlier.
How to prepare your graphics?
There couple ways for preparing graphic tiles for games.
I've used piskel editor for drawing sprites.
It's free, it's comfortable enough and available for all major platforms(also it avaialble online from browser).
I'm using 16 colours pallete for sprites and Agon specific 16 colours palette can grabbed here. It's ready to use pallete - just install it to piskel editor and you'll got safe to use colours.
I've used 16 by 16 sprite sizes but it's matter only on rendering stage(it can be almost any size if it will fits into VDP's ram).
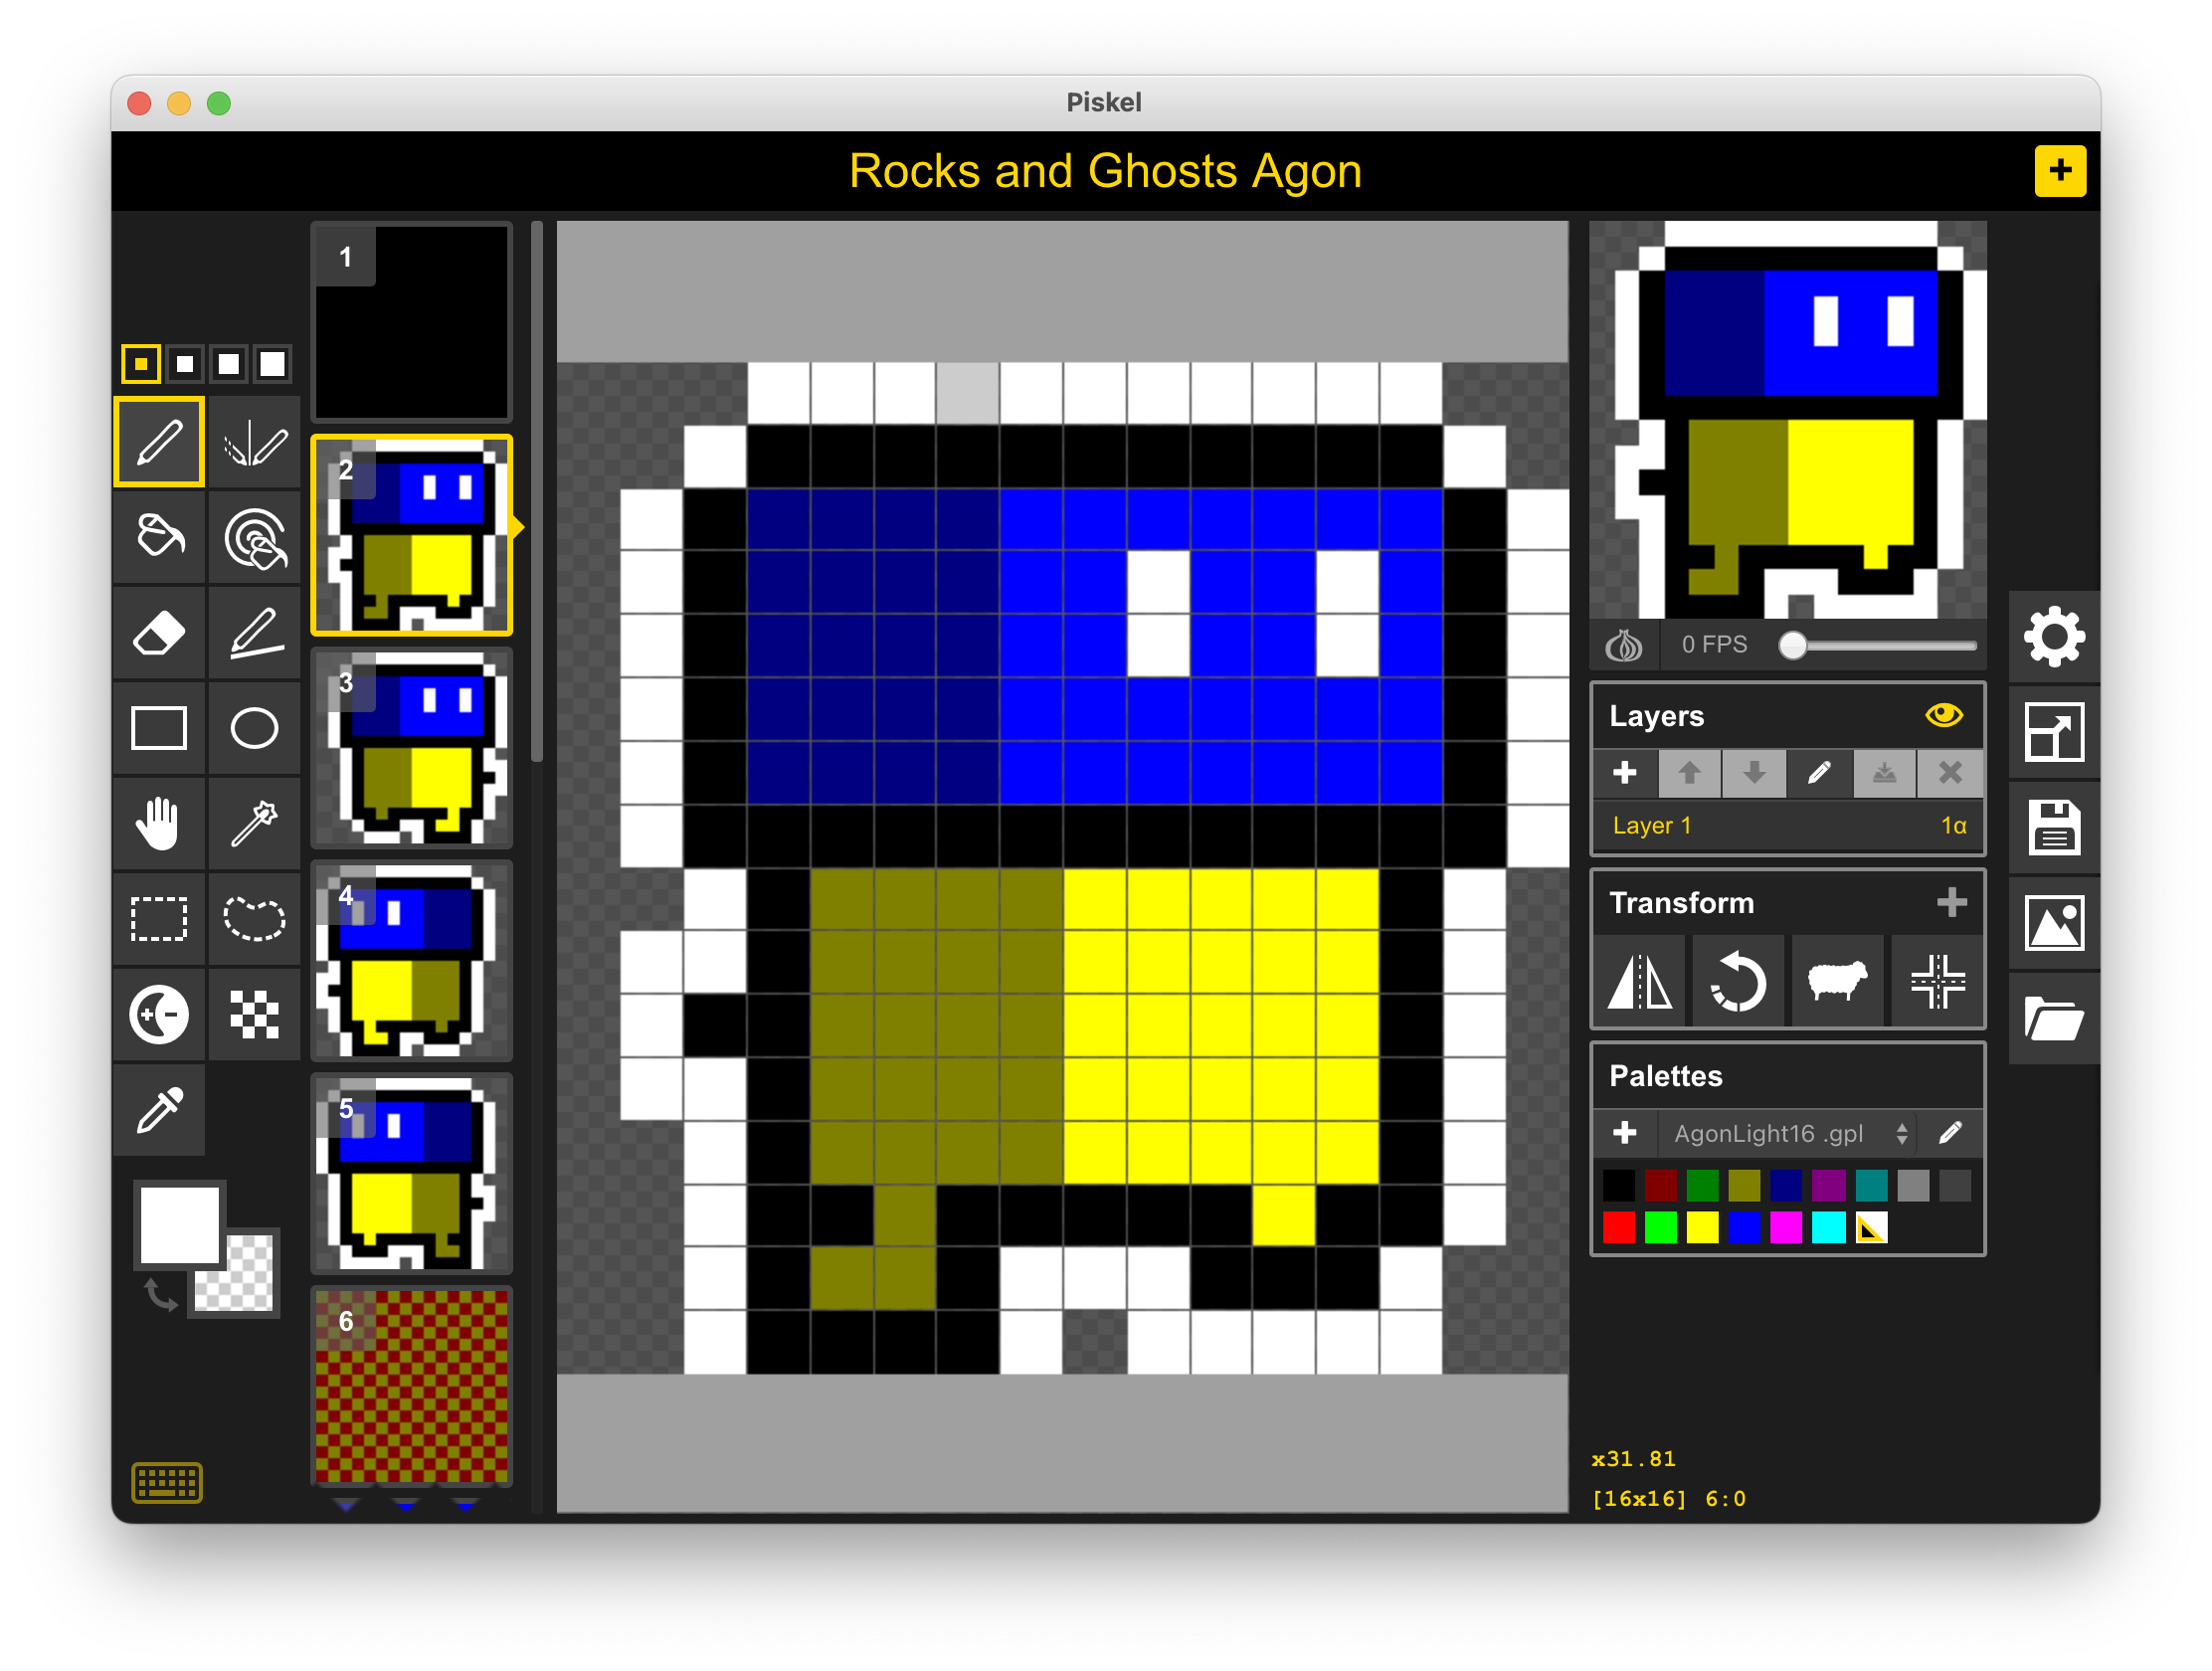
I've drawn sprites by hand and exported every sprite as sepparate pngs. And don't forget for non transparent empty bitmap(we'll use it for erasing tiles).
You have your own artwork but you can't just include PNG file into your assembly code.
There're several ways to convert your images to acceptable RGBA format.
I'm macOS user and I've used ImageMagick for converting graphics.
For converting single PNG to sprite enough simple call of convert your-image.png sprite.rgba and you'll got ready to use RGBA bitmap. That can be used by VDP and our code.
But we have a bit more than single image. Yes, you can write small script that convert every image by image. Or you can special tool from imagemagick package that called mogrify. And after single call of command mogrify -format rgba *.png we'll got bunch of .rgba files that ready to use bitmaps.
Another way is saving raw images from GIMP(that also crossplatform).
Preparing levels
Defining level requirements
We'll using binary level representation not only for storing where object X or Y placed but also for storing state of some object.
It's easy make with simple and good working tool CharPad. It was made for C64 but it's good enough for almost any retro computer. Only one issue for me - it have no macOS version but it works fine under Wine.
We should define what kind of tiles we need(and tiles here also describes state of some objects).
Let's try find:
EMPTY SPACE. Let it be zero tile - it's easier to check in code(AND A/OR A is enough for checking this kind of tile).
PLAYER position(or starting point) - better mark it with some character styles symbol
unbreakable WALL
ROCK and it have couple states: standing in place and falling(it required for correct gravitation behavior)
GROUND that can be destroyed by player
CRYSTAL that also have couple states(standing and falling)
... And GHOST - it have 4 states(by movement direction - it can fly left, right, up and down).
You can find file that I've used in game's repository.
It was from my another attempt of making same game but for Jupiter Ace but still good enough for our tasks.
Another requirement is map size - it should be 32x23(for our engine).
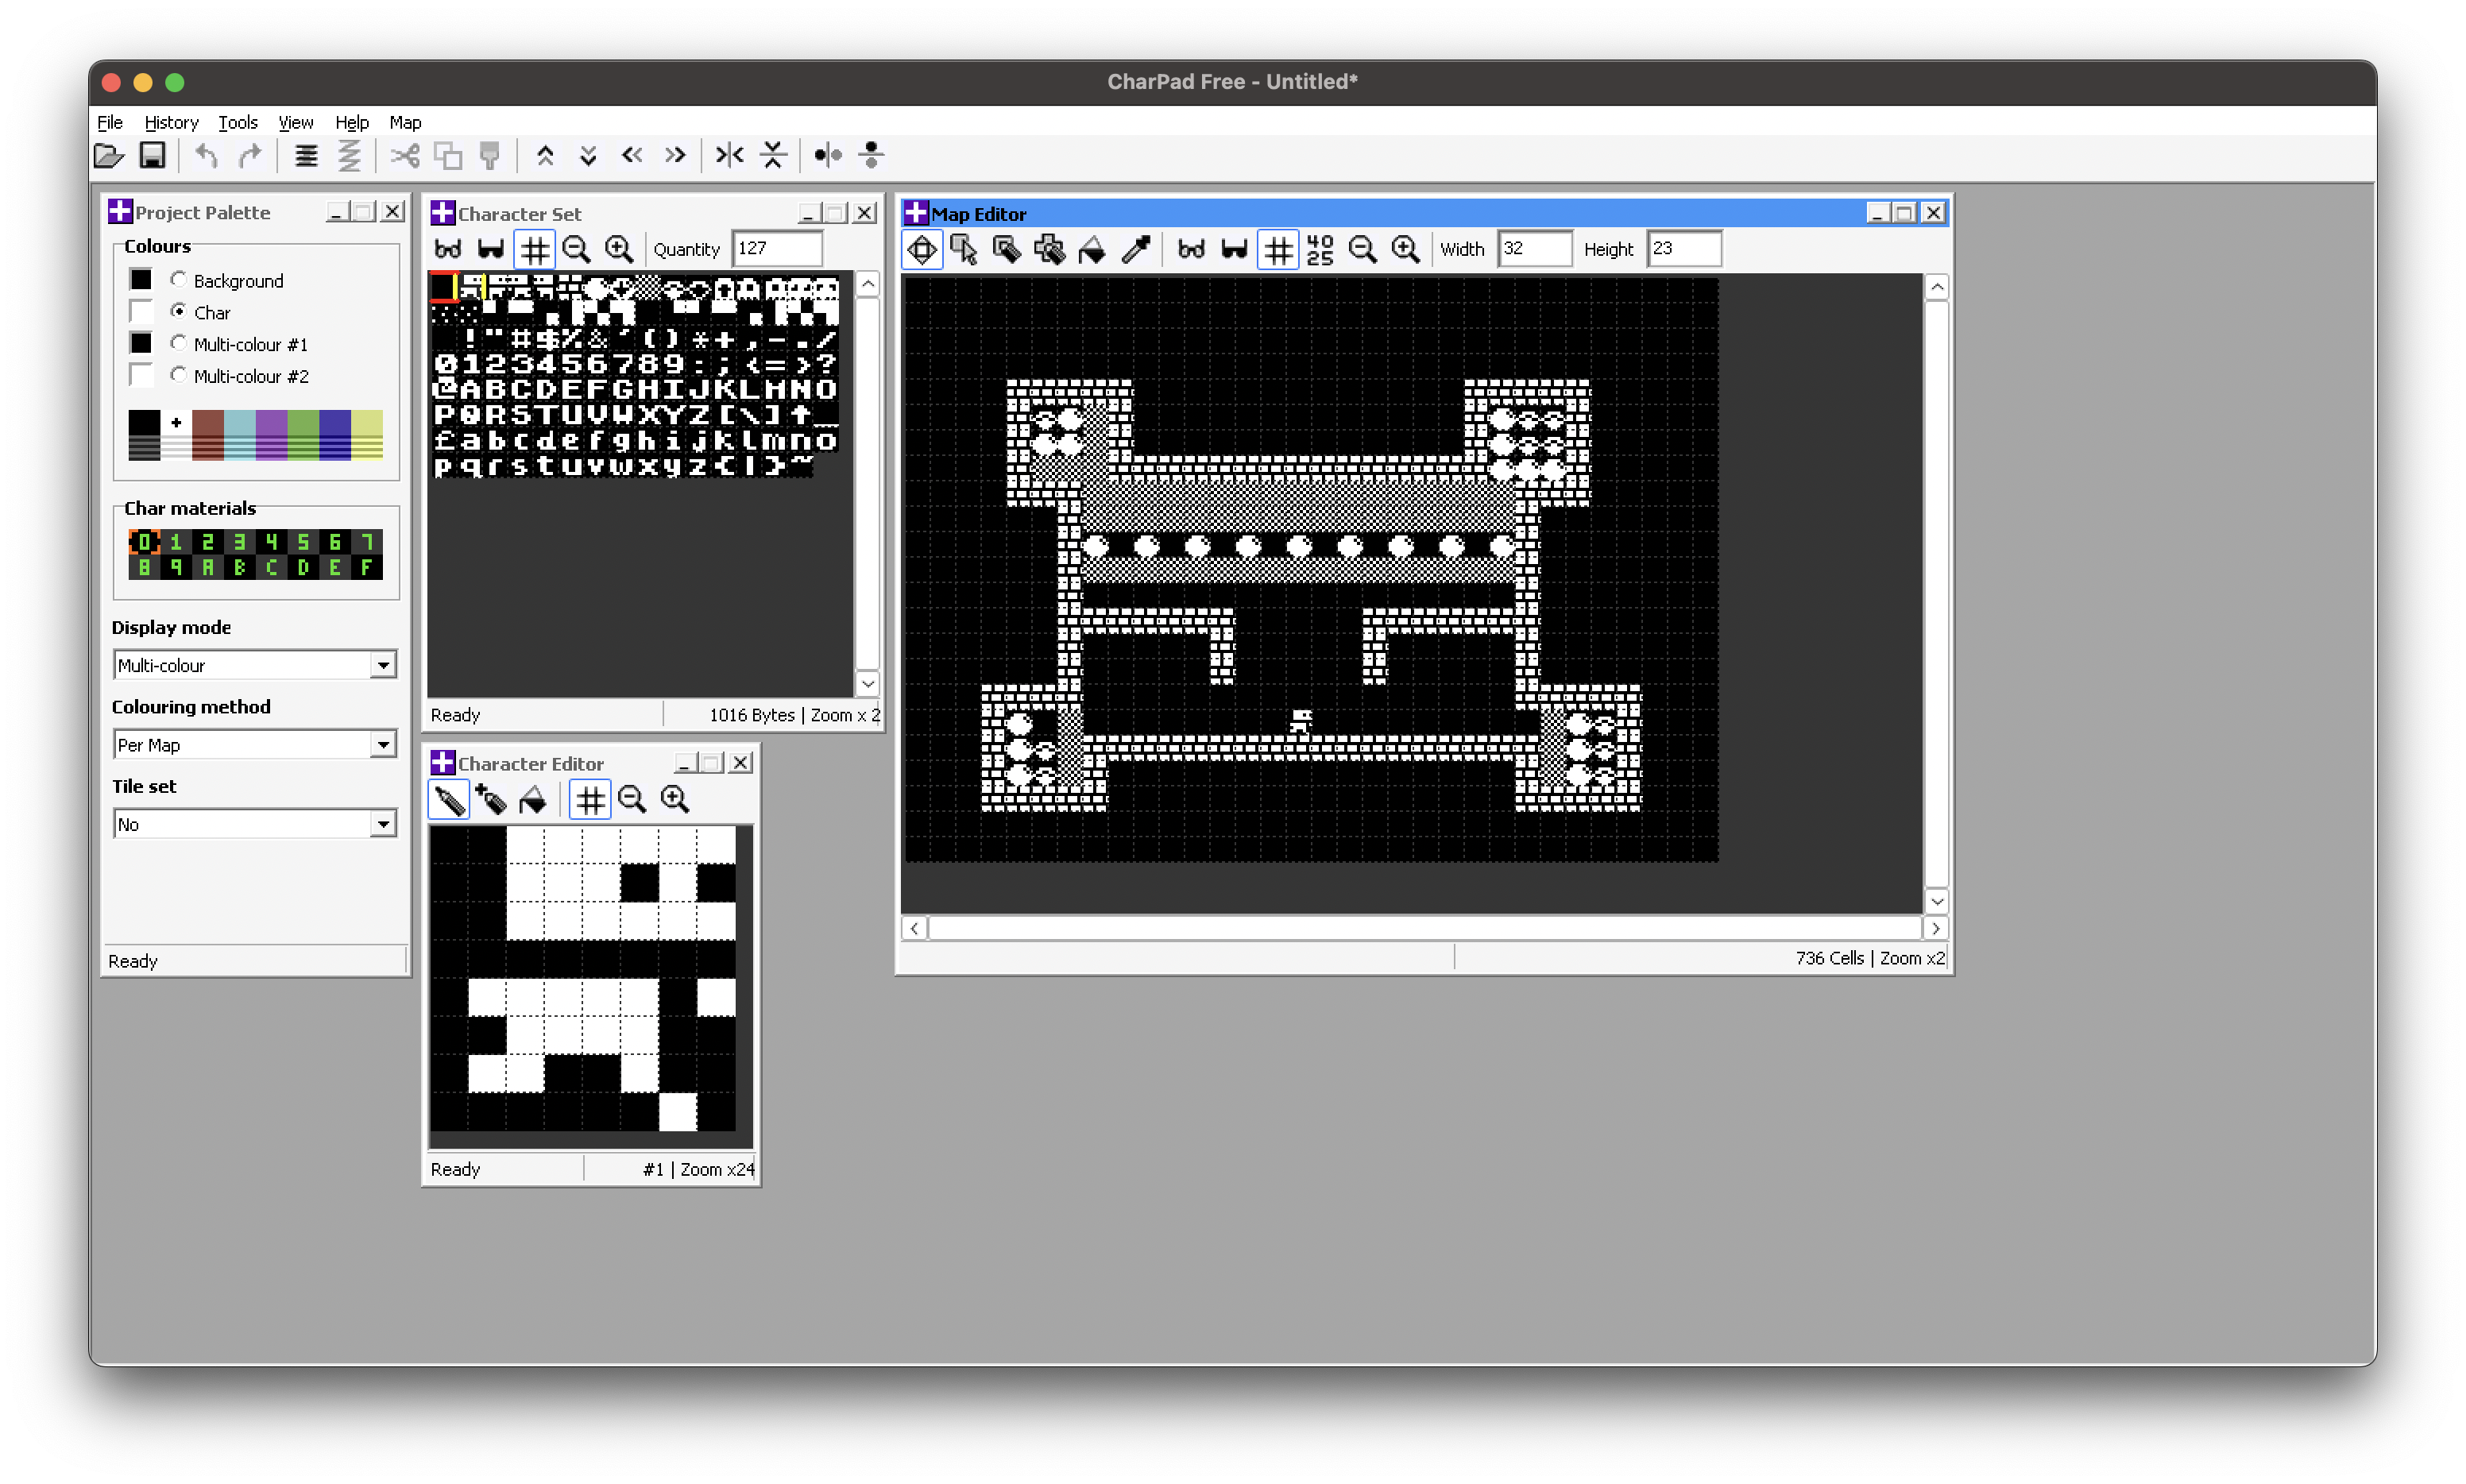
Now you can create your own levels(or edit my levels) - just use binary import and export for map. Exported level should be 736 bytes. It's small count and we even can forget about compressing it(on 512K ram beast).
Part where we'll go to our Agon Light and forget about world of bigger machines and light speed computing.
We'll need latest ez80-asm on our Agon Light(just copy asm.bin and asm.ldr to /mos/ directory of Agon's SD card) and Nano text editor.
Basic prerequirements - we should have our bitmaps(converted) and at least one level in our source root.
Application initialization
All basic initialization(and MOS application header) let's write in our crt.inc file - it'll content basic entry point(code window can be scrolled):
    ASSUME ADL=1    ;; Say to our assembler that we working in 24 bit addressing - honestly it isn't necessary here but I've used it
    org $40000      ;; 0x40000 is address where user ram is starts - all applications should be loaded here
    jp _start       ;; this is first instruction that will be executed in our binary - let's go to our startup code

    align 64        ;; From offset 64 should be placed header that will describe how to execute our application

    db "MOS"        ;; Magic word - MOS finds executables by this mark
    db 00           ;; Version of header
    db 01           ;; We using ADL so this byte should be equals 1. If we'd developed legacy mode application this byte should be zeroed

_start:
    push ix     ;; I've found that we should preserve index registers or system can crash
    push iy     ;;

    call _main  ;; Call our game's code

    pop iy      ;; Restoring them
    pop ix      ;;

    ld hl,0     ;; HL contains error code - we'll think that we never got error
    ret

;; Constants
mos_getkey:	equ	$00
mos_sysvars:	equ	$08

;; Macro that helps execute
    macro MOSCALL func
    ld a, func
    rst.lil $08
    endmacro
I've commented a lot almost all lines of init file - so I wish it don't require too many focus better use this time for more interesting part - VDP routines and couple small tricks.
And in our main source(rokky.asm or call what you like) file we'll include it:
    include "crt.inc"

;; Here starts our game's code
_main:
    ret
After assembling it with asm rokky.asm - we'll got application that starts and exits successfully.
VDP
Most important thing that I should say in this article is about how VDP works in Agon.
VDP is just serial terminal that works on very fast UART. If you'll sent byte that contains letter via UART - you'll got this letter on screen. If you'll send some control sequence to this UART - it will be executed as command.
Most important thing to understand:
- There aren't difference between text, control sequences(VDU commands) and sprites data - it's just bytes that we'll send over UART
So if we'll read in documentation something like "Use VDU 12 for cleaning screen" it means only one thing - just send byte 12. Technically, there no difference between letters and VDU commands, they are just bytes. That all. And this opens door for our first optimisation - we'll init our screen mode, hide cursor, upload all sprites and clean screen by one request to MOS.
For uploading big bunches of data we shouldn't use many RST $10(putc) calls for every byte we can prepare all data in single packet and send it via single RST $18 call. Less call we'll make - less CPU cycles we'll got overhead.
If you'll read VDP's manual for uploading single bitmap to VDP we should select it, prepare upload command and only after it send bitmap byte by byte. It's cost around 4-5 lines of code per sprite - hard to read and not looks too clear. But our ez80 assembler is macro assembler. Macroses came to our life for simplifing similar tasks.
We have one important thing - all our bitmaps are 16 by 16 pixels, so we'll have almost the same code for uploading bitmap. Changes only number of bitmap and file name.
So we can prepare macros:
    macro DEFSPRITE num, file
    db 23, 27, 0
    db num
    db 23, 27, 1
    dw 16, 16
    incbin file
    endmacro
This macros prepares all dirty work for us - it selects bitmap with number num, it sends command for uploading bitmap(important thing - bitmap size are 16 bits sized) and includes bitmap.
So our VDP initialization can look like:
BMP_NOTHING:	equ $00
BMP_WALK_R0:	equ $01
;; ...
;; Skipped a bit
;; ...

vdp_init:
    ld hl, init_cmd              ;; Setting start address for our VDP commands
    ld bc, init_cmd_end-init_cmd ;; Setting packet lenght
    rst.lil $18                  ;; And sending them to VDP
    ret
init_cmd:
    db 22, 1 	;; Setting video mode 1(similar to "VDU 22,1" command)

    ;; Here goes including our sprites "BMP_...." names are constants that we'd set several lines before
    DEFSPRITE BMP_NOTHING, "imgs/nothing.rgba"
    DEFSPRITE BMP_WALK_R0, "imgs/walk_r0.rgba"
    ;; ... skipped a bit ...

    db 12       ;; Cleaning screen
init_cmd_end:
Just one MOS call(RST $18) and we setted video mode, prepared screen and uploaded all bitmaps to memory. It's a lot quicker than sending byte by byte(and a lot more faster than sending them via our local functions-wrappers).
Of cause, if you want use different sized bitmaps - you can extend macros and set width and height parameters in it.
Loading bitmaps is good but why we want load it? For drawing. For this task we need 2 routines - one selects bitmap, another draws it on screen.
Select is dead simple:
; A - number
bmp_select:
	ld (@bmp), a        ;; Labels started with "@" are local. We're storing bitmap number to our packet
	ld hl, @cmd         ;; Setting our command start
	ld bc, @end-@cmd    ;; Setting our command lenght
	rst.lil $18         ;; Sending our packet by one request
	ret
@cmd:
	db 23, 27, 0
@bmp:
	db 0
@end:
Drawing routine a bit more complex but still easy to understand. It's uses per tile coordinates. If you want use per pixel coordinates - just drop out multiplications.
; DE - Coordinates(reg E - x, reg D - y)
bmp_draw:
;; X coordinate(per tile)
	ld b, 16
	ld c, e
	mlt bc   ; BC = B * C

	ld a, c
	ld (@c_x), a     ;; Storing BC to command
	ld a, b
	ld (@c_x+1), a

;; Y coordinate(per tile with offset - skiping first text line - for game status)
	ld b, 16
	ld c, d
	mlt bc      ;; BC contains Y * 16
	ld hl, 8
	add hl, bc  ;; HL = BC+8; 8 pixels offset from top of screen

	ld a, l
	ld (@c_y), a
	ld a, h
	ld (@c_y+1), a  ;; Storing HL to command


	ld hl, @cmd
	ld bc, @end-@cmd
	rst.lil $18     ;; Sending command to VDP
	ret
@cmd:
	db 23, 27, 3
@c_x:   dw 0
@c_y:	dw 0
@end:
You can try draw some tiles on screen:
    ld a, BMP_WALK_R0
    call bmp_select

    ld de, $0101
    call bmp_draw

    ld de, $0404
    call bmp_draw
We in one step to drawing our map.
Drawing tile on map
First important thing that we should implement is procedure that will convert address in our level buffer to coordinates on screen.
Level have some offset - it can be removed just by subtraction of address of tile from address of buffer.
As we said before - our level have 32 pixels width. So we should implement division by 32 with reminder.
Reminder(X coordinate) part can be easily found by bitmask - just by using AND operand. For division by 32 used optimal code that implements division correctly.
; Input: HL - addr
; In DE will be coordinates on screen
; Basicly removing level_buffer offset and division by 32 with reminder
addr_to_coords:
	push hl
	push af
	ld de, level_buffer

	or a
	sbc hl, de

	;; Now HL is offset from level_buffer
	;; We have 32 columns(can be found just by and 31)

	ld a, l
	and 31
	ld e, a

	;; And next code just implements quick division by 32

	xor a
	add hl, hl
	rla
	add hl, hl
	rla
	add hl, hl
	rla
	ld d, h
	pop af
	pop hl
	ret
We'll need replace tiles on our map(and render them), so for this task and for basic render I've let make single operation - map_poke. Basicly it founds replacement(can be found in render.inc file) in dictionary MAP TILES->BITMAPS(animations performed in same way), selects required bitmap, calculated on screen coordinates and calls bmp_draw(that draws bitmap).
It will be useful on many stages later but it also simplifies map rendering function to simple loop:
;; Draws buffer to screen
draw_buffer:
	ld a, 12
	call putc

	ld hl, level_buffer
	ld bc, 736
@loop:
	push bc
	push hl
;; We just walking thru the map and poking their bytes where they was
	ld a, (hl)
	call map_poke
	pop hl
	inc hl
	pop bc
	dec bc
	ld a, b
	or c
	jr nz, @loop

	ret
When we'll implement our game life cycle we'll use this map_poke routine for updating on screen only changed tiles.
But it will be in next article!
Stay connected!